Photography 101: ISO
Welcome back to the second post of my Photography 101 series. I'm still so happy with Part 1 of the series, and I really appreciate those who subscribed because of it! The Part 1 of my series talks about the very basics of photography, such as buying a DSLR camera and getting familiar with its functions. If you haven't read it yet, I'd strongly recommend you read it here. As for those who have read the previous post, let's move on to learn the first fundamental pillar of photography: ISO. Like I said a while before, there are only three concepts you need to familiarize with in order to start shooting. And to your luck, I'm going to be talking about them in depth. So let's get started with ISO!
ISO
ISO determines your camera's sensitivity to light. In simple terms, it controls the brightness of your pictures. As you increase your ISO, your photos would get brighter. On most DSLR cameras, the lowest ISO starts at 80 or 100, while the highest ISO level may vary from 1000 to 1600 or even 3200. Keep in mind that the most expensive cameras have a wider range of ISO settings.
So how can I apply this to my photography?
The first thing I do when I turn on my camera, is to navigate to its ISO settings. It is vital to check your ISO settings according to the lighting! You don't want to shoot a photo session to find out later that the lighting was completely off! In low light settings, your ISO levels need to be on the higher scale. In brighter settings, such as a sunny day, your ISO levels need to be at a lower level.
However, increasing your ISO settings come with a cost. The higher your settings are, the more likely it would produce an undesirable texture in your photos called noise or grain.
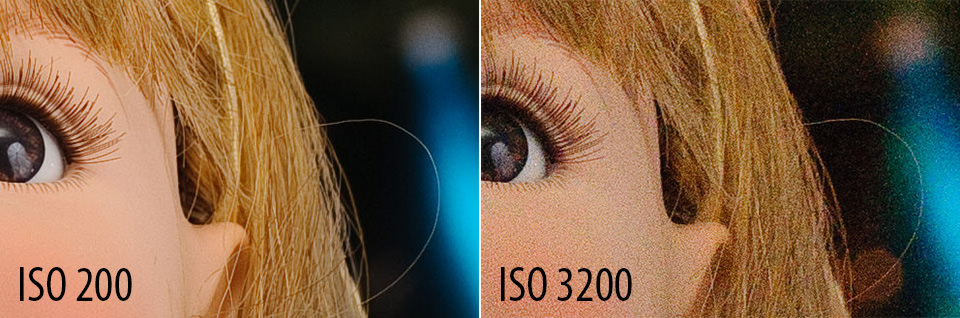 |
| Source |
As you can see, the higher ISO level at 3200 produces an unattractive texture, while the ISO at 200 produces a crisp and clear image.
As a general rule of thumb, try to keep your ISO at its lowest possible settings so that you can prevent noise/grain.
Usually, if it's sunny and I'm outdoors, I'd have an ISO of 100 - 200. When I shoot indoors by a window or if it's partly cloudy, I shoot with an ISO of 200-400. When it's dark, I shoot with an ISO of 1600, and when it's nighttime, I shoot at 3200. As you can see, different lighting situations call for different ISOs -- that's why it is vital to ALWAYS adjust your ISO settings as you take your pictures.
In conclusion...
1. ISO controls the brightness of your photos.
2. In brighter light settings, keep your ISO at a lower number. In low light settings, bump up your ISO.
3. Always try to keep your ISO as low as possible. (Higher ISOs produce texture called noise or grain.)
4. Don't forget to adjust your ISO before you take any photo!
And there you have it! If you have any question about ISO, comment down below, and I'd be sure to answer them. My next post will be about the second fundamental pillar of photography: shutter speed. Stay tuned!
Comments
Post a Comment